Welcome back to Ask TWW, where you ask the questions and I do my best to answer without wandering too far into the weeds. Today we’re talking about lubricating drill bits, shop pencils, exterior finishes in hot and humid climates, and the age-old battle of square dogs vs round dogs.
Relevant Links
@ericsturgulewski2399 – I noticed you sprayed something on a Forstner bit in a recent video. I’ve never really seen anyone use lubricant when drilling wood before. Does it leave any kind of stain?
That was a dry lubricant, specifically BladeCote. And no, it’s not the same thing as spraying oily lube all over your woodworking tools. Please don’t do that unless your goal is to make finishing even more complicated than it already is. Dry lube goes on wet, but the carrier flashes off quickly and leaves behind a thin lubricating film. That film helps reduce friction, which means less heat, less burning, and less premature dulling of the bit or blade.
This is especially helpful with something like a Forstner bit in a deep hole. Those bits can heat up quickly, and if the chips don’t clear well, things can get ugly fast. A little dry lube, plus clearing the chips as you go, can make a big difference.
The key is using a lubricant that’s actually meant for woodworking tools. Wet lubricants can soak into the wood, stain the surface, gum up the dust, and create a nasty paste that makes the problem worse. A good dry lube won’t do that. I use it on drill bits, router bits, table saw blades, bandsaw blades, and pretty much anything in the shop that cuts and gets hot.
@RidgidRon – Do you have a favorite between a regular pencil, carpenter pencil, and marking knife?
It depends on the job. I know, very exciting answer. But in the shop, marking tools usually fall into three categories, rough, medium, and fine.
For rough marking, I like Pica pencils. The lead is thick, durable, and easy to see. I keep one with regular lead and one with white lead for darker woods. Carpenter pencils live in this same rough category. They’re fine for construction and general carpentry, but for furniture work and joinery layout, they’re a little like using a sledgehammer to adjust a hinge.
For everyday layout, I like a .7mm mechanical pencil. It’s precise enough for most work, sturdy enough that the lead doesn’t snap every three seconds, and it works nicely with measuring tools that have marking holes.
For finer work, I’ll use a .5mm mechanical pencil or a marking knife. A .5mm pencil gives a very fine line, but the lead is more fragile, so don’t write with the enthusiasm of a toddler holding a crayon.
A marking knife is the precision king. It gives you a super fine line, severs the wood fibers, and can help guide a saw or chisel. But it’s not forgiving. You can’t erase a knife line, and depending on your lighting and eyesight, it can be harder to see.
So the short version is this, Pica pencil for rough work, .7mm mechanical pencil for general layout, and .5mm pencil or marking knife when precision really matters.
@teresasaint7220 – How do you recommend finishing a wood piece that will be outside in a sunny and soupy humid climate?
First of all, I love the word soupy. Apparently not everyone uses it, which is both surprising and mildly disappointing.
For outdoor furniture, the big enemy isn’t just rain or humidity. It’s the sun. UV exposure breaks finishes down, and once the finish starts to fail, moisture gets in and the whole thing starts moving downhill.
That means the real question isn’t, “What finish will last forever?” because that finish doesn’t exist. The better question is, “What finish am I actually willing to maintain?”
Film finishes, like varnish, can look great and offer excellent protection, especially early on. But when they fail, they tend to fail dramatically. Cracking, peeling, flaking, the whole greatest hits album. And once you miss the maintenance window, you’re usually sanding back a mess before you can refinish.
These days, for outdoor furniture that gets real exposure and less-than-perfect maintenance, I lean toward non-film-forming finishes. Things like Osmo UV-Protection Oil, Australian Timber Oil, Penofin, and Rubio DuroGrit. They still need upkeep, but they usually fade and dry out gradually instead of turning into a peeling horror show.
In hot and humid climates, that can be especially useful because film finishes can trap moisture and create a nice little vacation home for mold and mildew. Non-film finishes let the wood breathe a bit more and are generally easier to refresh.
If your project lives under a covered patio, screened porch, or furniture covers, that changes the equation. You’ll get longer maintenance intervals and more finish options. But if it’s sitting out in full sun and weather, pick the finish you’ll actually maintain. Mother Nature always wins eventually. The best you can do is choose how annoying the rematch will be.
@sanyoshovah2887 – What’s the advantage of square dogs vs round dogs? I like the aesthetic of square dogs, but I feel round dogs might be more versatile.
You’re right. Round dogs are generally more versatile. Square dogs are generally cooler. Welcome to woodworking, where practical decisions and romantic nonsense fight constantly.
Round dog holes are easier to add because you’re just drilling 3/4″ holes. You can add them during the build or later, and you can put them almost anywhere you want. They also open the door to a huge ecosystem of accessories, dogs, holdfasts, clamps, stops, fixtures, and about 47,000 3D-printed doodads you may or may not need. The downside is that drilling clean, perfectly perpendicular holes through a thick bench top can be trickier than it sounds. It’s doable, but you need the right bit and ideally some kind of guide to keep the drill straight.
Square dogs are more traditional. They’re usually built into the bench from the beginning, often as part of a dedicated dog strip. They have a nice wide face, they register well against the work, and they’re just satisfying to use. But they’re not nearly as flexible, and you’re not going to casually add square dog holes after the bench is built unless you enjoy unnecessary suffering.
For most people, I’d recommend round 3/4″ dog holes. They’re easier, more flexible, and compatible with a ton of accessories. But if you’re building a traditional bench from scratch and you love the look and feel of square dogs, they’re still a great choice. And remember, choosing square dogs doesn’t mean you can’t also drill a few round holes later. It just depends how much you want your bench to look like Swiss cheese.
Want to submit a question?
Questions for Ask TWW come from our YouTube members and Patreon supporters. If you want a chance to have your question featured in a future episode, join us in either place.
And while you’re there, check out Grain of Truth, my behind-the-scenes series of short tips, advice, and the occasional woodworking-adjacent rant. Which, let’s be honest, is probably the healthiest possible outlet for that sort of thing.
The post Why Exterior Finishes FAIL | Ask TWW appeared first on The Wood Whisperer.
from The Wood Whisperer https://ift.tt/G1FsPX8
via
IFTTT


 Which machines and power tools are best for the grunt work of furniture making
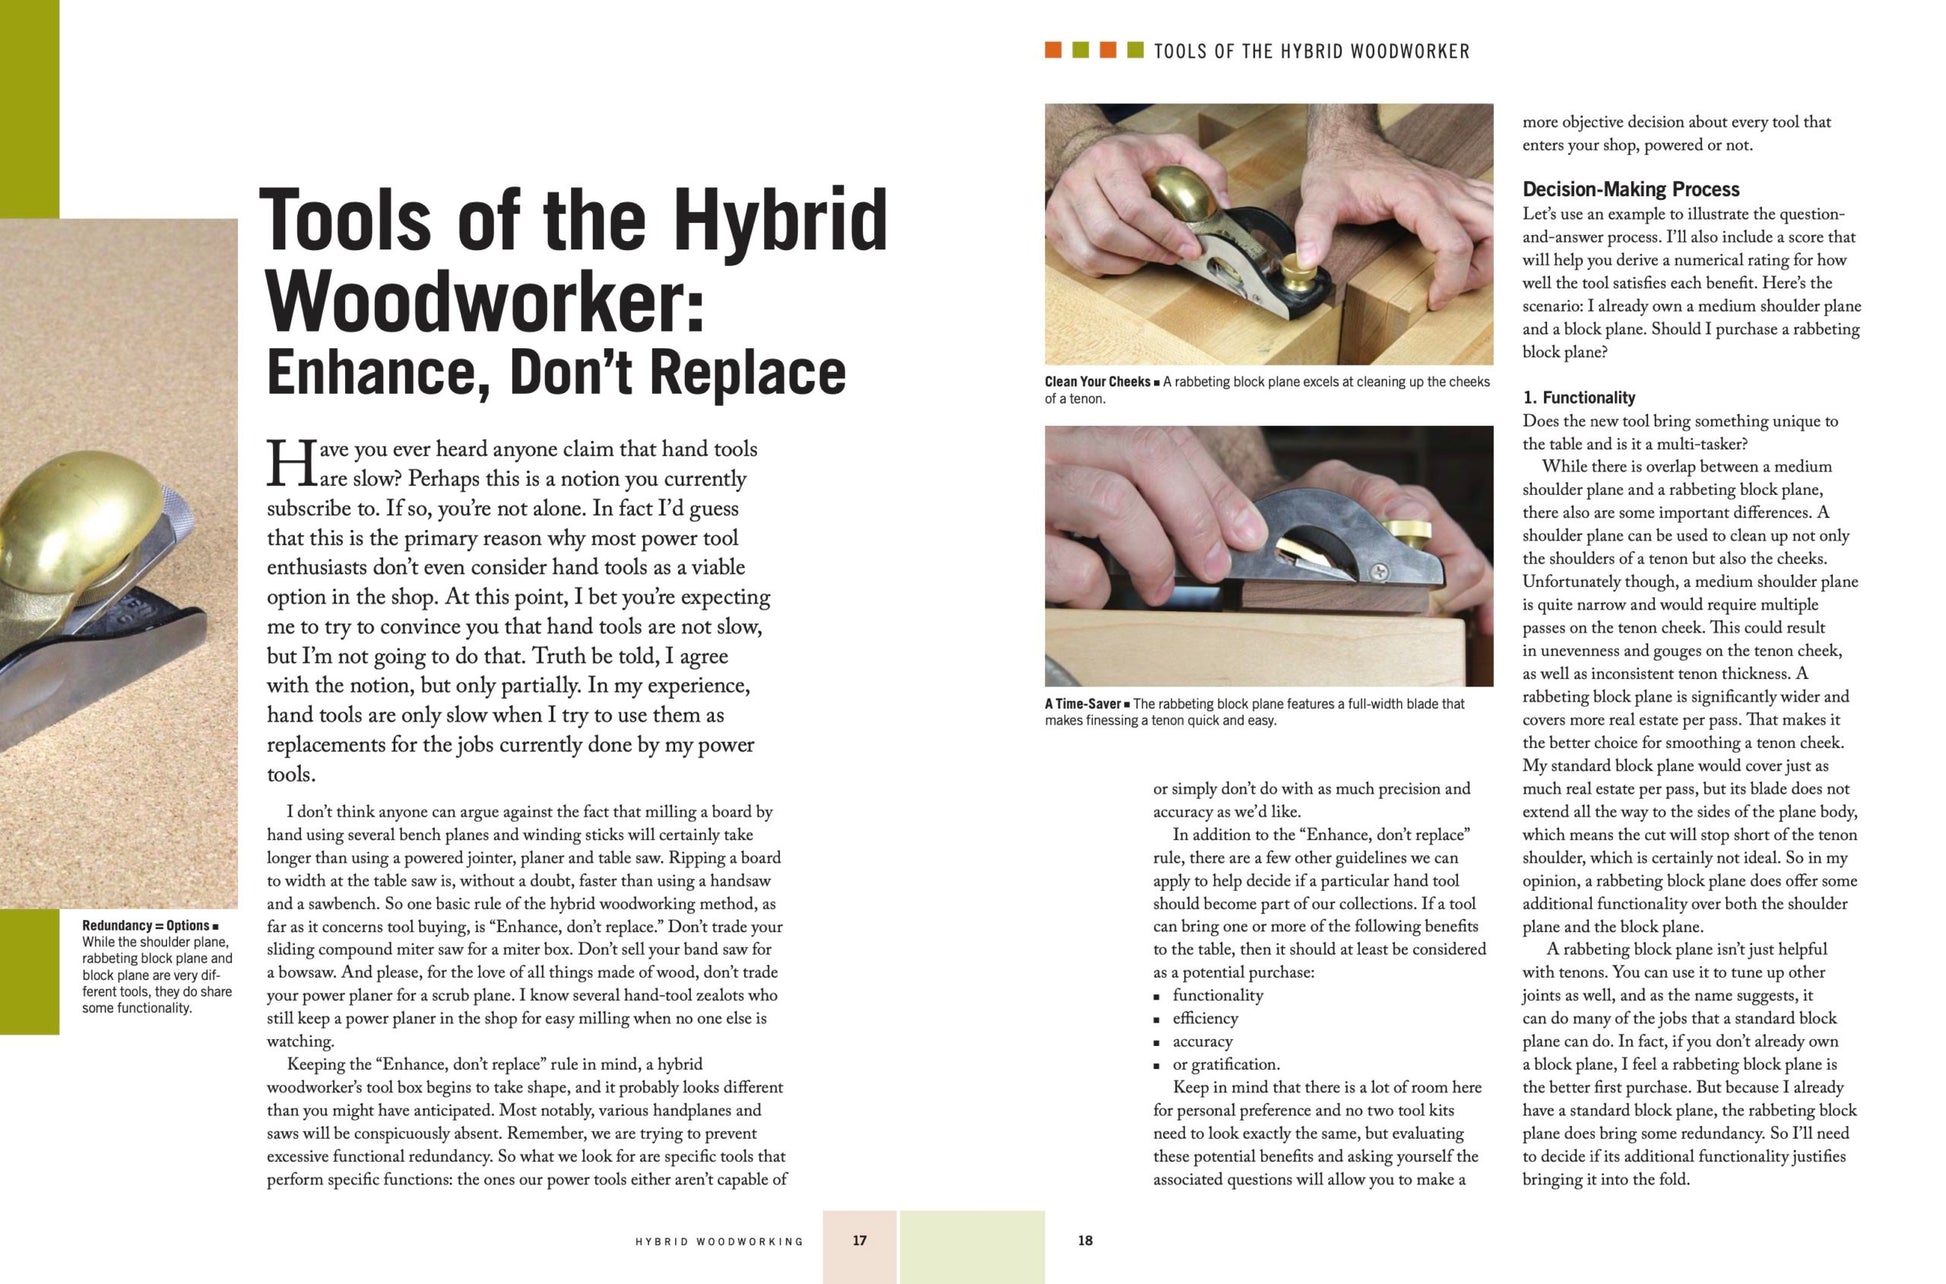
 Every copy is personally signed by Marc – something you won’t get if you buy the book on Amazon.

 3 Exclusive Bonuses
 Top 5 Planes for the Hybrid Woodworker
 Hybrid Woodworking Seminar
 Bonus Resources