Show notes coming soon.
The post Ugh Lumber Prices – Am I Right? appeared first on The Wood Whisperer.
from The Wood Whisperer https://ift.tt/3t2ODJi
via IFTTT

Show notes coming soon.
The post Ugh Lumber Prices – Am I Right? appeared first on The Wood Whisperer.

It’s hard to find a topic in woodworking that’s more confusing and more full of opinions and hearsay than finishing. Double that for outdoor finishing since there’s the additional variables of climate and exposure. One person will swear by one product but another person will tell you to avoid it like the plague. I’m in the fortunate position that everything I do is documented in some fashion so I will often “take one for the team” by putting a piece of furniture out in the elements with a particular finish just to see what happens. I can then report those observations in the name of SCIENCE! These real world observations add to my bank of theoretical knowledge and allow me to supply and informed opinion whenever I’m asked the dreaded “What finish should I use?” question.
In this video we’ll discuss several pieces of furniture I’ve made throughout the years, how they were finished and how they held up. In some cases, a refinish was necessary and we’ll talk about that too.
The post Outdoor Finishes | Real World Results appeared first on The Wood Whisperer.
Show notes coming soon
The post Nicole Gets the Big One Tonight appeared first on The Wood Whisperer.
Show notes coming soon.
The post Birthday Boy appeared first on The Wood Whisperer.
Show notes coming soon.
The post Atomized Pancake Batter appeared first on The Wood Whisperer.
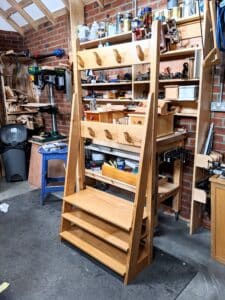
As you probably know, The Wood Whisperer has always been focused on mid to high level woodworking. I like to think we are welcoming to beginners as well but rarely do we make content aimed directly at a person who has almost no tools and no experience in the shop. That is, until now. With the help of my wife Nicole, who stands in as “the beginner”, we’ll show you how to make a simple but elegant blanket ladder using a very small and basic set of tools. In fact, the entire set costs less than $500 and will serve you well on future projects too. While Nicole has been around woodworking for the last 15 years, she has almost no personal experience. Her questions guide the discussions and should prove useful to anyone who is new to the craft. This video is LONG with a lot of conversation and explanation. If this isn’t your cup of tea, consider sharing the video with someone you’d like to see get into the craft. We feel this is an excellent starting point.
In the video we reference two other videos you might want to check out: Block Plane and Applying Rubio.
These plans feature measured drawings and a cut list.
The list below represents the tools I selected specifically for this beginner series. Many of them maybe be things you already have in your house or garage and all of them can be used again on future projects.
If purchasing pre-surfaced material from the big box store, you’ll want THREE 1 x 3’s. Although they are called “one by threes”, their actual dimensions will usually be smaller and the thickness will actually be 3/4″, which is exactly what we want for this project. You will then cut those three boards into the following pieces. Be sure to consult the PDF plan for more detail.
The post Easy Blanket Ladder | For Beginners appeared first on The Wood Whisperer.
As the covid year unfolded, everyone gradually accepted lockdowns, self-isolation in shielding and then a mass of other self-monitoring systems of distancing and safety margins. Mask-wearing for those of us working wood all day long and on a daily basis was not new at all, yet it was those wearing them for the first time…
Read the full post Following On on Paul Sellers' Blog.
I think that everyone is questioning what is normal anymore. My year has been very normal and normalcy for me is mostly that life revolves around my making and working on things I make from wood. With a dozen and more decent-sized projects filmed, made, stacked up and under my belt, I remind myself of…
Read the full post It’s Been a Year on Paul Sellers' Blog.
Become a YouTube member and gain access to our bonus aftershow or if you prefer Patreon
00:00:35 – Welcome back to the Woodworking Morning Show
00:01:38 – Schedule Change Announcement!
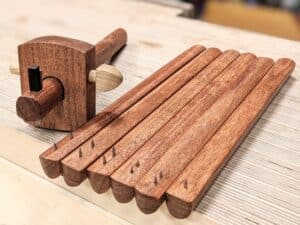
00:02:45 – New iPhone holder project!
00:04:17 – Block plane tune-up video Find new videos on our Amazon Store
00:07:07 – Do you ever use quick-change collets for your routers? https://ift.tt/3rTZHId
00:08:03 – Giveaway today! Use the code MARC25 at https://ift.tt/2PugK6j until April 16th for 25% your order
00:08:40 – Thanks to our Patreon and YouTube members
h00:10:20 – Is a parallelogram jointer worth the upgrade?
00:12:55 – Are quick-change collets standard?
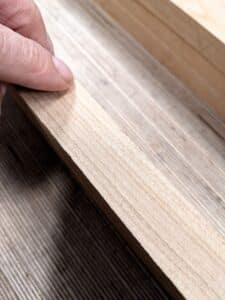
00:13:20 – Is prefinished plywood ok for cabinets?
00:14:00 – What are your favorite router accessories?
00:15:30 – Which three furniture designers would you take to dinner?
00:18:05 – How can I design a pizza “rocker” cutter with a wooden handle to be safe to use?
00:18:53 – Powermatic’s 100 year anniversary!
00:20:25 – Is pre-primed pine ok for a face frame for cabinets?
00:22:50 – What order do you suggest buying the “big ticket” items for woodworking?
00:26:52 – Is there any sag on your router table due to the weight of the router?
00:29:00 – Did you finish your blacker house chair?
00:30:04 – Is the dado stack a safe tool to use?
00:31:10 – What’s a good 3M filter for paint? or these
00:33:10 – Giveaway time from Parcil Safety!
Use the code MARC25 until April 16th for 25% your order
00:42:40 – Congratulations!
00:43:30 – What is the dumbest mistake you’ve recently made?
New time starting next week! Thursday Evening Friday Morning Show!
We started our live show in 2014 as a community-focused Q&A show featuring me (Marc) and my wife Nicole as a way to connect with other woodworkers each week. It’s a lot of fun and a great way to share thoughts and ideas with your fellow woodworkers.
Join us each week at 11:30 Eastern and be sure to subscribe and click the bell notification to get an email when we publish a new video or go live.
Searchable Spreadsheet for past episodes of The Woodworking Morning Show https://ift.tt/31NVquV
Looking for the products and tools Marc uses and recommends?
You can find them at our Amazon stores:
US – https://ift.tt/2vz53jt
Canada – https://ift.tt/2MmmxYq
UK – https://ift.tt/2KMCdRA
The post I Don’t Want Your Tips! appeared first on The Wood Whisperer.
I did an experiment today. I took pieces of cherry and set myself a goal. I had eight pieces of rough-sawn cherry on my bench for a project I am building. I did not look at the wood in any sort of depth first but simply found myself tracing my fingers over the bandsawn surfaces,…
Read the full post Plane Away! on Paul Sellers' Blog.