from Paul Sellers' Blog https://ift.tt/cPnqWTO
via IFTTT


If you can believe it, we’re going into our 19th year making videos here at The Wood Whisperer. Given the fact that it’s a holiday week, I thought it might be fun to show you guys a little behind the scenes including my daily routine and a look at the tech we use to make our videos come to life. I hope you enjoy!
Links in order of appearance:
The post Behind the Scenes with a Youtube Veteran appeared first on The Wood Whisperer.


Recently, a kind woman brought in a broken chair for chair repair. While I typically avoid this type of work, her story made it hard to turn down. Apparently her husband had back surgery and frequently drops into the chair with some force. So I decided to take the job and I didn’t end up charging for the work.
Whenever I take on a repair, my first step is always a thorough inspection. In addition to the obvious damage, it’s important to check for previous repairs, as they can offer valuable insights for the current fix.
In this case, I found at least two prior breaks, one of which had been repaired with a dowel and appeared to be holding well. The current break, however, was in a new location.
After evaluating the damage, I concluded that crafting a new leg or leg portion would be the best solution. But for a quicker fix, I opted for epoxy to glue the broken pieces back together. While this isn’t a permanent solution, it should give the chair several more years of use.
With a bit of cleanup and color matching, the repair blends in well. I’m confident the chair’s owner will be pleased with the results.
#sponsored Be sure to visit Norfolk Wood Shop
Use the below codes at checkout:
HOOTWHISPERER: 10% OFF – Can be used on existing sales and clearance items, but not on machines, gift shop items, or classes
GRANDHOOTWHISPER: 20% OFF Grand Wood Finishes 16oz sizes of Hardwax Oil, Finishing Oil, and Hemp Oil *Can be used once per customer. Offers expire January 11th, 2025
The post I Gave This Up Years Ago | Chair Repair appeared first on The Wood Whisperer.


Order the Frank Strazza Course Bundle
Most shop tours show you the overall space, the tools, and maybe a couple of organizational highlights. I already did that here in my previous shop tour. Today, we’re going one step deeper by showing how all of my organization solutions, including the state of most of my drawers! I hope you enjoy.
Please note, any links to Amazon.com are affiliate links and your purchase helps support us financially. Thank you!
The post The Details other Shop Tours Skip | Shop Organization Tour appeared first on The Wood Whisperer.
Our Black Friday and Cyber Monday sales are still live! Grab some great TWW apparel, an autographed book from Marc, or one of our special tools! Use the code BLACK20 at checkout to get 20% off your order. If you live in the US and order $75 or more, you’ll get FREE SHIPPING!!
Are you looking to learn woodworking from a professional and get support during your woodworking journey? You should check out our detailed courses at The Wood Whisperer Guild. With over 60+ classes, you’re sure to find something you would love to have in your home! Right now is a great time to join because if you use the code BLACK40 you’ll get 40% off 2 courses! Learn more about what TWW Guild has to offer and join today!


The post Black Friday/Cyber Monday Sale! appeared first on The Wood Whisperer.

Welcome to another Tool Unleashed, where I provide first impressions and mini tool reviews for your enjoyment. UNLEASH THE TOOLS!
Makrs Stain Pads (Sent to me for free. Affiliate Link)
 When these stain pads showed up at the shop I kind of dismissed them. I don’t stain very often so I didn’t think I would use them. Oddly enough, I ended up with a large staining project and finally had a chance to use them. I was very impressed with how well they laid down stain that I decided to see how they would work using clear finish and was very impressed with the results. The microfiber outer layer leaves an incredibly smooth finish and the foam interior drinks up a ton of liquid. That means each dip into the finish lasts longer and goes further. I liked the product so much that I approached them about working together and we now have a coupon code that will save you 15% on your purchase. Use code TWW at checkout.
Canyon Fire Tools MicroMag Adjuster (Sent to me for free, but no affiliate link)
 This is a micro-adjuster that can be added to pretty much any fence, table saw or otherwise. A large rare earth magnet holds the unit to the fence while a larger Magswitch magnet tuns on and off as needed for use. With the fence unlocked and the Magswitch magnet engaged, you can rotate the thumb wheel 5/8” in each direction for a total of 1 1/4” of micro-adjustment. So if you’re really sneaking up on a measurement, no more tap tap tap business. You can simply make your test cut, unlock the fence and then use the adjuster to push or pull the fence as needed. Most importantly, this thing doesn’t get in my way and stays on the saw permanently. It’s not cheap, but it is made in the USA by a small maker.
Stupid Simple Tools Saw Calibrator (Sent to me for free. Affiliate link)
 The saw calibrator is a pretty straightforward. It drops right into your miter slot for checking the alignment of your blade and fence with the miter slot. I used the tool to recalibrate my saw and it worked like a charm. While I do enjoy the aesthetics and functionality, I do have to mention that there are other comparably-priced solutions on the market that do more, such as the A-LINE-IT Calibration Tool.
The post Making Finishing Easy, Micro-Adjustment for any Fence, Table Saw Calibrator | Tools Unleashed 03 appeared first on The Wood Whisperer.


Kreg recently released a new tool that appears to be a straight shot at the Festool Domino. It makes the mortises with any drill and does so via a clever mechanism that advances the bit about 1/16″ per pass. Kreg also sells Domino-like tenons that complete the system. But is it a Domino killer? Watch this Kreg MortiseMate Review to find out!
The post Kreg MortiseMate Review – Should Festool Be Worried? appeared first on The Wood Whisperer.


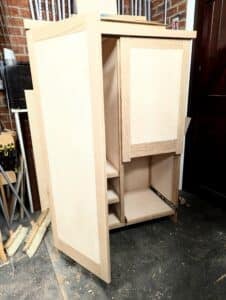
My daughter Ava has been asking me to build a vanity for years. I intentionally avoided it primarily because I didn’t want to build something really nice only for her to outgrow it in a year or two. Nicole purchased a small pink kids vanity off Amazon and sure enough, that thing was absolutely destroyed by crayons, markers, lipstick and general abuse and it ultimately ended up in a landfill. Finally, at 8 years old, I felt Ava was ready for a real piece of furniture. So I set myself to task of building a vanity for my little girl.
The vanity features two continuous grain drawers in the base as well as a hutch unit that contains two drawers and a door with a lighted mirror. The vanity will also serve as a desk and the hutch is removable should she ever decide to convert it to full-time desk duty.
If you’d like to build this project, we have a full 19 video course in the Wood Whisperer Guild. You’ll received downloadable PDF and SketchUp plans and all of the detailed video instruction you can possibly ask for.


The post A Vanity For My Little Girl appeared first on The Wood Whisperer.

Don’t miss the pre-order pricing for Caleb James’ Dry Bar Cube!
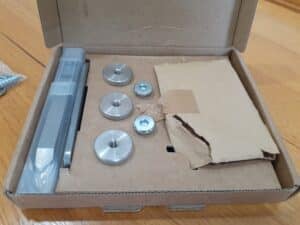
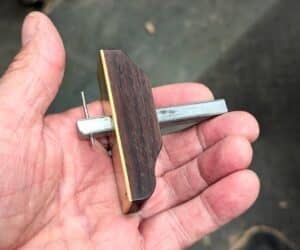
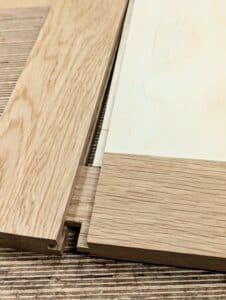
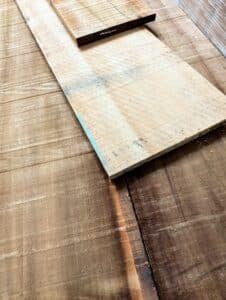
Canvas prints always look better in a floating frame. Many frames are commercially available but most will be cheaply made and won’t be a perfect fit for your artwork. Fortunately, making your own DIY floating frame is easy and inexpensive. All you need is a table saw, miter saw, and drill. For the wood, head to the “project boards” section of your local hardware store.
The post DIY Floating Frames that Anyone Can Make! appeared first on The Wood Whisperer.


It’s been a crazy couple of years since we moved to Missouri. If you’d like to follow the entire saga, start here: Marc’s Shop.
The 2024 Shop Tour begins with a review of the changes since our last update on Oct. 22 2022. From there we’ll discuss the general workflow and layout in the shop. I’ll then show you more detail as we review the various tools and pieces of shop furniture. We’ll finish up with a Q&A where I deep dive into the topics you were most interested in.
The post From Old Firehouse to Woodworking Wonderland | Shop Tour 2024 appeared first on The Wood Whisperer.

00:00:00 Good Morning!
00:01:59 Giveaways later in the show https://backsidesandpaper.com/
00:02:49 Do you want to see my chisel storage?
00:05:05 Workbench cabinet course
00:05:46 Housekeeping and PBS supporting pitch :)
00:09:33 Can you show us your new under tablesaw cabinet?
00:13:32 How many blades do you keep on hand for your saws?
00:14:25 Why did you get rid of the Japanese Chisels?
00:16:12 Guild Facebook Group easy link
00:16:29 Email from DavidK – Scotch-Brite Grit Chart
00:17:46 The PBS warm and fuzzies from Robert
00:18:09 Question from Les for Ava
00:19:17 Thank you Adam!
00:20:08 Question from Chris – Protecting tempura paint? Polycrylic General Finishes High Performance (Amazon affiliate links)
00:22:08 Thank you TheJentaru! Tacos for Todd!
00:22:29 Question from Alan – Advice on making your own wipe on poly?
00:24:44 Hi Josh! Josh’s spreadsheets Q&A Live Spreadsheet Spag and Friends Q&A Spreadsheet
00:25:20 Thank you Jim! Also watch out for fake accounts
00:26:58 Question from Garage Shop Woodworking – any good Guild courses that implement CNC? Littleton Console
00:28:30 End Table Deep Dive for more CNC
00:28:50 Thank you Ryan!
00:29:23 Thank you Daniel for #Tacos4Todd
00:29:59 Questions from John on the Breadboard End Dining Table
00:34:31 Thank you HomerSimpson for the donuts!
00:36:20 Thank you Jake!
00:36:35 Thank you Jeanine!
00:37:01 Using Makr Sponge with water based poly and it worked great. Don’t forget to use code TWW for 15% off your order
00:37:35 Would you still recommend Carbon Method for your saw surface? Use coupon code SPAGCOAT for 10% off
00:39:11 Sorry Joshua Nicole is running a little behind
00:39:51 Question from Lane – What Honing Guide do you use on your chisels?
00:42:30 Thank you TheJentaru!
00:43:39 Do we plan to do any new interviews in the near future?
00:44:37 Will you collaborate with Jory again?
00:45:36 What is Tempera paint?
00:46:04 LOL Nicole is a bookie (got it on reply Les ;)
00:46:24 Nicole cares about Fallout76
00:47:00 Chisel giveaway
00:49:09 Congrats Heartwood Woodshop!
00:50:02 Backside sandpaper and Guild course giveaway!
00:50:13 When’s the next Wood Talk? 2 episodes per month
00:50:28 What happened to your Festool sponsorship?
00:53:50 Thank you Michael for being one of our earliest supporters https://ift.tt/TK5ZsfH
00:54:36 Congrats Jason Goodrich!
00:55:23 Congrats CAZWorks Woodworking!
00:55:57 What are your thoughts on Star Wars Outlaws? (Amazon Affiliate Link)
00:59:21 New day and time for our monthly Guild meeting. Check the website for details!
Join this channel to get access to perks:
https://www.youtube.com/channel/UCKp44bWWZIiOPShPN_ytShw/join
Sign up for our free newsletter to be notified of a new video or other cool stuff happening at The Wood Whisperer!
Take a woodworking class online with The Wood Whisperer
SUPPORT US ON PATREON!
PRODUCTS RECOMMENDED BY MARC
US – https://www.amazon.com/shop/thewoodwhisperer
Canada – https://www.amazon.ca/shop/thewoodwhisperer
UK – https://www.amazon.co.uk/shop/thewoodwhisperer
The post Woodworking Morning Show – Your Weekly Inspiration Boost! appeared first on The Wood Whisperer.

This video was sponsored by Osmo!
As part of our recent kitchen renovation, we had several areas of flooring that required new material. As a result, the entire kitchen floor was sanded with the intention of staining to match the old adjoining floor. Fortunately (and unfortunately), the natural-colored floors made the space so bright and inviting that we knew there was no way we could go back to a dark stain.


But what about the rest of the floor?! You can’t really start and stop in the middle of a floor if you’re using traditional floor finishes as you’re likely to have very noticeable lines. Not to mention, there was no room left in the budget to increase the scope of the flooring project. That’s when I decided to attempt finishing the floor myself, using a finish that can easily blend into the remaining floor in the future: Osmo PolyX Oil.
The floors were sanded by the pros to remove the old finish. The floor was then sanded through to grits stopping at 120. The floors were then vacuumed thoroughly to remove any surface dust. Any baseboards or trim materials were masked with blue tape.
Coat 1
The first coat was applied using a brush around the perimeter and a roller for the main part of the floor. I worked in 5×5 sections, spreading the finish as thin as I reasonably could. Unlike painting a wall with a roller, you really want to use decent pressure on the roller to make the finish go as far as possible. Just be careful not to apply so much pressure that you break the roller or handle.
Wait 24 hrs.
Coat 2
The second coat was applied in a similar fashion, just using different tools. I decided to use the non-abrasive hand pad around the perimeter as I felt it did a better job of allowing me to work a small amount of finish into the surface. The roller was then used just to get some finish on the floor and then the FloorXcenter powered buffer comes in to finish the job. The buffer does an amazing job of spreading the finish while also working it into the pores of the wood. I essentially work one area thoroughly, occasionally pushing into an unfinished area to see if there’s anymore finish left on the pad. Once it starting looking pretty dry I could move onto the next section.
Coat 3
On some wood species, it might be necessary to apply a third coat. It really depends on what you see after the second coat. If the surface looks even and consistent, the third coat can be skipped. My floor only required two coats.
The finish takes a few weeks to cure completely but can be walked on with socks the next day. I gave it two days before moving our table back in and I waited a few weeks before putting down our area rug and floor mats.
Maintenance
The floor will be cleaned regularly with Osmo Wash and Care. Maybe once a year I’ll clean the floor with the buffer and their Liquid Wax Cleaner. And then every couple of years I’ll likely hit the main traffic areas with a fresh coat of Polyx Oil.

It’s important to know what this finish is, and what it isn’t. So here are five things I think you should know.
Amazon links are affiliate links.
The post Solving Your Floor Refinishing Dilemma: Osmo PolyX Oil Hardwood Floor Application appeared first on The Wood Whisperer.

Ever wish you had more control at the bandsaw? Most stock fences don’t provide easy drift adjustment or micro-adjustability, two things that can make a big difference in your day to day use of the tool. The Laguna Driftmaster DXIII hopes to solve that problem for you, if you have the cash.
I reviewed the original Laguna Driftmaster Fence System a couple of years ago and while I liked the feature set, I found the installation and maintenance to be a pain in the rear. Fortunately, most of my gripes were addressed with the new Laguna Driftmaster DXIII.
If you purchase the Laguna Driftmaster DXII using our link, you can save 5% off your order and we’ll get a small portion of the sale as an affiliate with Beaver Industrial Tools.
There’s really not much competition in this space, which means I’m essentially evaluating this product in a vacuum with nothing to compare it to. The only logical comparison is the previous generation of the Driftmaster, which is no longer in production.
That’s why, in spite of the few minor quirks, the Laguna Driftmaster DXIII represents a substantial upgrade for just about anyone looking to up their resaw game. And if you’re thinking about utilizing the bandsaw for joinery, this is the kind of setup you’ll want to look into.
The post Take Your Bandsaw Resawing To The Next Level With The Laguna Driftmaster DXIII Fence! appeared first on The Wood Whisperer.