
An after-market miter gauge is a nice upgrade over the stock miter gauge that came with your table saw. A good miter gauge will allow you to hit just about any angle with accuracy and precision and ideally it comes with a fence that provides even more stability and features. Some miter gauges are better than others, as you’ll see in this Miter Gauge Review. While price is often an indicator of quality when it comes to woodworking tools, you’ll see in this case that the most expensive miter gauge was actually one of the poorest performers. Buyer beware!
Disclosure: I’m a one-man shop and I don’t have the luxury of testing miter gauges for an entire year, which would really be the ideal way to review these things. While my methods are far from perfect, I did my best to simulate a reasonable amount of usage and evaluated the parameters I felt were relevant to most woodworkers. It’s important to note that in most cases, my results represent just a single data point as I could only afford to order one of each miter gauge. Any gauge that tested poorly was re-tested and the company was contacted for advice/replacements. The outcomes of those interactions are reported in the review. Every gauge in this miter gauge review was purchased with my own money. Reported results are as accurate as I could make them and any opinions expressed are my own. *Please note that prices are fluctuating daily. All prices shown in this review are what I paid during the 4th quarter of 2021. With the current market volatility, you will likely see very different prices now.*
Criteria: I included every manufacturer I could find that makes a miter gauge with a fence. There are several other miter gauges on the market that do not come with a fence, but to keep the playing field even I did not include those in this review.
Stats: If you want to compare some of the vital stats of each miter gauge, please feel free to check out the spreadsheet I created: Miter Gauge Review
Wood River Snap-Set – Buy Now | $128.99
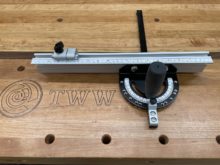
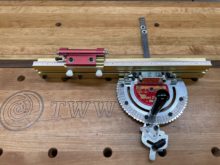
Assembly is straightforward and only took about 3 1/2 minutes. The Wood River gauge features a steel protractor head with 13 positive stops, a steel miter bar and an aluminum non-telescoping fence with a flip-stop. At this price range, a flip-stop is an unexpected luxury. Unfortunately, if you want a sacrificial fence on your miter gauge, like I do, the stop becomes unusable. The stop itself did show some deflection under pressure. There’s no built-in way to accommodate a sacrificial fence either, so you’ll need double sided tape for that.
It’s a bummer that the fence comes with the measuring tape pre-attached. The tape starts at zero, which means you’ll either need apply a new tape or cut the fence in order for the tape to be usable. This is because we never put a fence right up against the blade and the tape measure should account for that. Unfortunately, as provided, this tape is useless. Also, you want to be wary of any fence that has something of an L-shape as those are more likely to be visually deceiving when setting your clearance on mitered cuts. Especially if the blade is high, you can easily forget to account for that overhang and accidentally cut into it. Sawstop owners know what I’m talking about.
The gauge can rotate 90 degrees in both directions and has a resolution of 1/10th of a degree via a traditional viewfinder. The positive stops are engaged with a simple spring-loaded pin which locks into the detents securely. The miter bar adjusts quickly via small spring-loaded balls. Side adjustments aren’t my favorite but it’s a common format that works well enough. I just prefer making adjustments from the top with the miter bar fully engaged with the slot. The fence was square right out of the box and after some test cuts, proved to hit its angles with accuracy and precision. After minor abuse the unit held both its miter bar setting and its squareness setting. If calibration is ever required, you can loosen two screws and adjust the fence as needed.
Summary: Overall this is a solid no-frills miter gauge that’s going to be a nice upgrade over any stock gauge that comes with your tools. There are a few areas for improvement but at this price point, it’s hard to complain too much. The flip stop is nice to see but the fact that the unit doesn’t easily accommodate a sacrificial fence is something of a deal-breaker for me, personally. But, does it hit its angles? Yes it does.
Incra Miter 1000 – Buy Now | $129.99
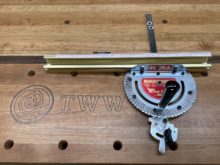
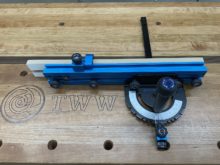
Assembly took about 4 minutes but my experience with the brand gave me a bit of an advantage. Incra gauges are definitely guilty of looking more complicated than they really are. The Incra 1000 features a steel protractor head with 41 positive stops and 1/4 degree of resolution, thanks to a vernier cursor. It also has a steel miter bar and an aluminum non-telescoping fence with a very simple stop block. The stop block rides in a t-track, which means the stop won’t work with sacrificial fences. While the stop is pretty no-frills, it has one notable advantage in that there’s absolutely no deflection under pressure. If you forgo the stop in favor of a sacrificial fence, you’ll at least have a t-slot to use for attachment, even if the slot doesn’t take standard 1/4-20 hardware.
The tape on the fence is movable, so it can be calibrated on the fly with fence moves and you’ll notice they thought ahead about that whole fence not touching the blade thing as they even give you some numbers on the other side of zero. The gauge can rotate 90 degrees in both directions and the positive stops are achieved via a saw-tooth design that’s incredibly effective. When the teeth are engaged, there’s zero play and you have nothing but confidence in your setting.
The miter bar adjustment features split nylon washers that bow out when a tapered screw is tightened up. This design is consistent across all of Incra’s miter gauges. If your fit is loose, like mine, you can also put additional split washers on the right side in place of the non-split black washers. Unfortunately the adjustment range is kind of small. The Allen wrench quickly goes from Smooth Operator to Bump & Grind, as it pops and jumps somewhat disturbingly. I’ve actually bent Allen wrenches and stripped screws in the past trying to adjust my Incra miter gauge. So the system can be temperamental but it does work. Also note that although it’s a convenient above-the-bar adjustment, two of the washer sets are under the fence and under the protractor.
The fence was square right out of the box and the gauge hit all of its angles accurately when I performed some test cuts. After a little abuse, the miter bar and the angle settings didn’t budge at all. Though I can say from experience that over time, you will need to rotate and eventually replace the nylon washers. I just can’t simulate that much use here. If calibration is needed, you can simply loosen three screws, adjust the fence, and tighten the screws back down.
Summary: Incra makes a solid miter gauge and their big claim to fame is just how many positive stops they provide. You’ll see it gets even crazier with the higher-priced models in this review. But the one thing that plagues all Incra miter gauges is that many of their adjustments require a tool. On this one, you need to use the included screwdriver just to slide the fence. Incra is the only brand in this test that requires a tool for that adjustment and it’s so easily preventable. Personally, I’m used to it because this is the brand I’ve had for the last 10 years, but after playing with some of these other models I can safely say that it’s high time for Incra to rethink this dependance on a screwdriver. If you like the cut of Incra’s jib and you have a few more bucks in your pocket, I’d recommend skipping this one and jumping to the 1000SE, which we’ll look at soon.
Osborne EB-3 – Buy Now | $139.99
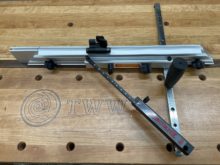
Assembly took over 15 minutes, but I’d say that’s mostly due to me overthinking. This Osborne EB-3 miter gauge looks nothing like the ones I’m used to and I was being extra caution since I plan on selling these gauges to other woodworkers after the review. The gauge rotates 45 degrees in both directions and has a resolution of 1 degree. Osborne is the ONLY miter gauge on the market that I know of that abandons the classic protractor style setup in favor of one that would make Pythagoras proud. The adjustment bar has 21 positive stops that are engaged with a spring-loaded pin in the underside of the bar, locking every 5 degrees. The scale can be tricky to visualize since the pointer is black and the bar itself is also black. The pointer is somewhat thick and there’s a gap between the pointer and the bar. All this adds up to some difficulty when trying to visualize a setting that’s between the detents, especially if you don’t have the best vision.
The Osborne has a steel miter bar that’s a bit longer than most of the competition at 21 1/2”. The gauge also features an aluminum fence that telescopes out to an impressive 40”. This is also the first miter gauge in our test that has a fence with angled ends. This may be personal preference but I’m not a fan. Angled ends facilitate bevel cuts, which I don’t do all that often. 99% of the things I use a miter gauge for are square cuts and simple miters. So I’m missing a whole chunk of support 99% of the time so that I have a slight advantage when I do the occasional bevel. That’s not a trade-off that makes sense for me, personally. Furthermore, with this angled design, most of the time my sacrificial fence will have a large unsupported area. Another limitation that will come up with any angled fence is that it limits the travel of the stop. In this case I can’t get closer than 3 1/4” from the blade. Another stop-related problem I noticed is that it’s WAY out of square. This is likely just a bad stop and I’m sure the company would send a replacement. Other stop-related issues include that fact that the knob can get in the way of taller workpieces and if you can’t use the stop with a sacrificial fence. On the positive side, however, there’s very little deflection to speak of. The fence does have two holes for attaching a sacrificial fence but they’re initially covered by the grip tape and they’re about 20” apart. Ideally, I’d like to see three points of attachment instead of just two. And obviously there’s no T-track on this fence.
The miter bar adjustment is a split bar design where you tighten the screws to bulge out the sides. The screws are all accessible from above and none are hidden. The fence was square right out of the box and it was able to hit the positive stop angles accurately. After some minor abuse, I noticed that the screw that holds the fence to the miter bar loosened up a bit but honestly I didn’t check that screw before doing the test. I suppose it could have already been a little loose. Also, the fence went slightly out of square. Fortunately, calibration is pretty easy. Loosen a screw at the back and then using a wrench, rotate the adjuster. I wasn’t sure what to think of this adjustment system until l got the wrench on there and started turning. It’s actually an incredibly responsive mechanism that gives you a lot of control as you square the fence to your blade. Most miter fence adjustments have you clumsily nudging the fence around until things are square. I like this system quite a bit. Not confident in the negative result of my first test, I repeated the abuse. The fence screw remained tight this time but the fence was once again out of square. After squaring it up again, I decided to see if I could mess up the setting with my hands alone. Turns out, I could. Moral to the story here: don’t be too rough with this one.
Summary: I really wanted to like the Osborne, mostly because I remember seeing Norm use it on the New Yankee Workshop and thought it looked cool. I give Osborne a LOT of credit for this triangle design though I don’t think it imparts nearly as much advantage over the competition as they claim. It’s a solid gauge that hits its detents well and has good capacity but the unit did lose its calibration after a little abuse. Let’s also talk about that grip tape. Obviously it’s optional as you don’t have to apply it but I’m still trying to decide if I actually like it. It’s incredibly coarse so it could scratch your work. On the flip side, the sandpaper ensures that the workpiece never moves during a cut. Because of this grippiness, it’s also nearly impossible to nudge the workpiece one way or the other to sneak up on a cut, which is something I do a lot. So my reaction is mixed and you may feel differently about it. Ultimately, it is optional but it’s very nice that it’s included in the box. If this idea is appealing to you but you’re interested in a different gauge, it might be worth ordering your own roll of grip tape. Anti-Slip Grip Tape
Overall this is a decent gauge that goes outside the box in it’s design and execution. My stop was a dud and I feel the non-detent adjustments will be somewhat coarse, but hey, Norm liked it! That’s gotta count for something.
Kreg KMS7102 – Buy Now | $149
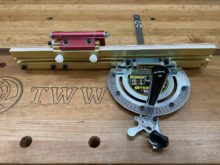
Assembly took about 15 minutes but most of that time was spent fiddling with the darn stop. This is one of those parts you wish they included pre-assembled. The Kreg Precision Miter Gauge features an aluminum protractor head, aluminum fence, and an aluminum miter bar. That’s a bold choice for a miter bar as I can see it being a potential weak point in the design, especially at a length of 24” (the longest you’ll find on the market). The gauge can rotate 50 degrees in both directions and has a resolution of 1/10 of a degree thanks to a high visibility vernier scale. It has 9 positive stops that are engaged with a brass pin, though this is an unfortunate design choice as the pin is not fixed to the gauge and if you should happen to turn the gauge upside down, the pin falls out. I also noticed a little play at each detent, but you can overcome it by putting a good amount of pressure down on the pin and then tightening the protractor head.
The Kreg stop is huge and there’s a decent amount of deflection if you push hard enough. The stop will accommodate a sacrificial fence if you modify it slightly by breaking off the end. That’s a permanent change so if you want to go back to just using the aluminum fence you’re out of luck. Also, the way the stop engages with the table surface and the fence, small parts could totally miss the stop. In general, I’m not a fan of Kreg’s stop as it seems a lot bigger than it needs to be. But I did see a photo of someone using it as a hold-down so perhaps that helps justify the larger footprint. The fence has two two t-tracks that accept 1/4-20 hardware but it also has that L-shaped design that we discussed earlier, so be careful when lining it up for miter cuts. A nice little bonus feature is a fence stop pin, which you can use to help return to a standard fence setting. This could help prevent cutting into the fence accidentally.
The miter bar adjustment features nylon set screws that protrude out of the side. You’ll need a pretty small screwdriver to adjust them effectively. After a little roughing up, the gauge seemed to hold its miter bar and angle settings just fine, but there’s a huge problem regarding squareness to the blade. Measured right out of the box, the fence was off. Normally this isn’t an issue since we can easily calibrate, but not so on the Kreg. On their website they boast that it’s factory calibrated, CNC cut, and there’s no need to spend time calibrating. What that actually means to you and me is that there’s no way to calibrate this thing. So what if a customer receives one that’s not square? It can happen. It did happen. I checked in multiple ways with multiple squares and everything confirms that the protractor head is out of square with the miter bar. So my humble request to any manufacturer that makes a miter gauge: please don’t do this. A miter gauge that can’t be calibrated is not a feature, it’s a flaw.
Summary: I don’t love the aluminum miter bar as it feels cheap and I get the impression that it wouldn’t be too hard to bend accidentally. I’m also not a big fan of the stop. But those are minor quibbles compared to the real issue of squareness to the blade. Kreg is a reputable company that makes great products. I know many people who own a Kreg miter gauge and they love it. All I can say is that both of the units I received were not square and there’s no way to make an adjustment. Kreg was very responsive and shipped a replacement immediately after seeing photographic evidence. Unfortunately, the replacement suffered from the same issue which tells me no one actually checked the replacement before shipping. I don’t know if this error is limited to a small batch of miter gauges or if this is a more widespread problem, but it’s something Kreg should probably look into and resolve. At this point I have to advise that you DO NOT buy this miter gauge.
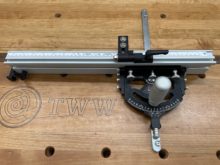
Incra 1000SE – Buy Now | $179 (My pick under $200)
Editor’s Note: As of January 2022, the price of this gauge has increased by $30 since I made my purchase in December of 2021.
There’s a lot in common between all Incra miter gauges so I’ll only highlight the differences from the previous one. The major upgrades the 1000SE receives over the 1000 are in the fence and the stop. The fence is a larger extrusion featuring a telescoping insert that extends to 31”. It also includes a flip stop that attaches to a toothed strip which provides very secure registration. The stop is pretty darn good and it features something that’s a must-have for me: a micro-adjuster! There are actually two arms that can be used separately or together, with and without, the included steel pins. The big disadvantage of this stop is that it requires a tool to make adjustments. It’s still good, but man is it annoying when you’re sneaking up on a perfect fit to have to go back and forth with the screwdriver. And the one place they went with a tool-less design to hold the stop to the fence, they opted for finger-torturing knurled nylon knobs. There’s a little bit of deflection in the stop when under pressure and it’s a little more noticeable when only using one arm, but as a user of this style miter gauge for the last ten years I can tell you that’s never really impacted my work. The stop can easily accommodate a sacrificial fence by adjusting its position to the front t-track. The fence takes standard 1/4-20 hardware but the company provides a couple of bolts and their special nuts which work incredibly well for attaching sacrificial fences. Another upgrade from the 1000 is the bracket that connects the protractor to the fence. This one actually allows for adjusting the fence square to the table surface, which is a welcome upgrade. This particular gauge was perfectly square right out of the box. Adjustment is just like on the 1000 and requires the loosening of a few screws in the fence bracket. Test cuts showed the gauge to be accurate and after a little abuse the miter bar and the angle settings didn’t budge at all.
Summary: In general, Incra makes a really nice miter gauge. This one has all of the benefits of the 1000 with the better fence and micro-adjustable stop. If you’re interested in an Incra-style gauge, I really think this one represents a sweet spot for most woodworkers. Not too pricey (at least when I purchased mine), more robust than the 1000 and includes some additional features you’ll really appreciate. The next two Incra miter gauges in the review are very similar to this one but they add the ability to hit even more angles via positive stops. So unless you know you need that kind of granularity, the SE is probably the one you want to look at.
Rockler – Buy Now | $189.99
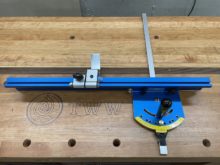
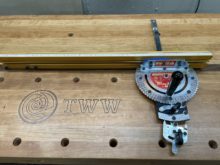
Assembly was straightforward and took about 7 minutes total. The gauge features an aluminum protractor head with 11 positive stops, a steel miter bar and an aluminum fence that telescopes to 24”. It also features a decent flip stop that has very little deflection. The gauge actually comes with a sacrificial fence and you can buy replacements from Rockler or make your own. Because the fence comes with a sacrificial fence, the stop is made to work with it by default. But the stop will not work if you remove the sacrificial fence.
The gauge can rotate 90 degrees in both directions and the scale tops out at 70 degrees. It also has an extra notch specifically labeled for storage. The protractor has 1 degree of resolution with a traditional viewfinder. The positive stops are engaged with a spring-loaded tooth. The mechanism here isn’t totally intuitive. I find myself wanting to pull back on the blue body below the knob, but it works best if you pull back on the knob itself while using your thumb for counter support. Unfortunately, I did notice a little bit of play in the detents. On many gauges that have this issue, you can get the correct setting by letting the gauge find the detent naturally. Don’t influence it’s position at all and just tighten it up. That technique works perfectly on this gauge, but if you happen to nudge the fence slightly before you tighten it up, you could affect the angle. The fit and finish on this one is pretty nice and the rubbery texture on nearly everything you need to touch is appreciated. The miter bar adjusts quickly and easily using nylon set screws, but this is another one that requires a small screwdriver. The fence was square right out of the box and after some test cuts, the gauge proved to hit its angles with accuracy and precision. After a little abuse, the miter bar and the angle settings didn’t budge at all.
Summary: Overall it’s a decent gauge, but I’m not thrilled about the play in the detents. While it’s an overall nice package, this gauge has the same inherent limitation as the Kreg in that it can’t be calibrated. Keep in mind that mine was perfectly square and needed no adjustment, so that’s a win. Maybe Rockler’s QC and machining standards are good enough to support this style of miter gauge, but I’d still be a lot more comfortable if I had SOME way to calibrate the gauge should something go off. At this price range, you’re probably better off with the Incra 1000SE, which I was able to get for $10 cheaper in December of 2021.
Incra 1000HD – Buy Now| $219
What makes the Incra 1000HD different is that it’s HIGH DEFINITION! If you look at the protractor head you’ll see more teeth than my new puppy Abby. That’s 180 positive stops. Yeah that’s right. A stop for every degree including 90 in both directions. And it has 1/10 of a degree resolution thanks to the vernier cursor.
Summary: There’s not a lot to say since everything else is pretty much the same as the 1000SE. But if you need 180 positive stops, this is a miter gauge you should consider.
Incra 3000 SE – Buy Now | $269
 The 3000SE used in this review is the one I purchased back in 2011. What makes this gauge different than the other Incras in the lineup is that it has a longer miter bar at 20 1/4” (most of that length is behind the fence so it doesn’t buy you much more cross-cut capacity) and a longer telescoping fence that goes to a whopping 49”. If you thought 180 positive stops was nuts, consider that the 3000SE has 364, thanks to the additional interlocking mechanisms at the back. These give you 1/2 degree of resolution and each half degree is a positive stop.
Summary: When I bought this gauge, I saw that 3000 was the highest number and assumed it must be the best. What I didn’t realize was that it was total overkill for my needs. In the 10 years I’ve had it, I’ve never used the 1/2 degree mechanisms at the back. It just wasn’t the right gauge for me, though I have to admire and respect the engineering here. If you need this kind of stuff, Incra is really the only game in town.
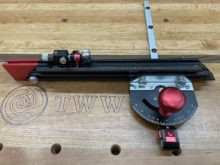
Jessem Mite R Excel II – Buy Now | $279 – (My pick over $200)
Assembly took almost 14 minutes and a lot of time was wasted trying to figure out the screw situation. Some of the screws wouldn’t thread fully onto the knobs and I assumed I had the wrong screw. Turns out the stop locking arm and one of the fence knobs just weren’t threaded well. I’m sure I can easily get some replacements from Jessem but at this price point, you hate to see that kind of thing. The gauge features a steel protractor head with 9 positive stops, a steel miter bar and an aluminum fence that telescopes to 38”. The miter bar is a little short at 17 1/2”. That’s 1/4” shorter than the cheapest unit in this test. But the amount of miter bar extending from the front of the fence is comparable to Incra, so it’s not really a detriment to functionality though at this price point I would have liked to see a longer miter bar. Jessem includes a flip-stop as well as an additional retractable stop on the end of the extension. There’s also an internal stop that prevents the telescoping fence from coming out completely, which I appreciate more than is reasonable.
The gauge rotates to 45 degrees in both directions and has a resolution of 1/10th a degree and that’s achieved via a vernier scale. The milling on these parts is really nice as the scale is just perfectly-fitted against the protractor and the head slides as smooth as butter. The positive stops are engaged with a spring-loaded pin that locks in place with zero slop. The fence as a t-slot that accepts 1/4-20 hardware and the stop easily adjusts for sacrificial fences. The stop has very little deflection but no micro-adjustment. At this price point, that’s a big disappointment. The fence also has a clever, if overcomplicated, system for helping you return the fence to its “home” setting via a nut on the inside track of the fence.
The miter bar adjustment is pretty unique, consisting of floating metal rings with an o-ring inside. The manual suggests putting a piece of paper between the ring and the miter slot which seemed to work as advertised. The fence was square right out of the box and after some test cuts, proved to hit its angles with accuracy and precision. After a little abuse, the miter bar and the angle settings didn’t budge at all. Calibrating squareness to the blade and squareness to the table are both possible via the square brackets on the sides. It’s clear someone put a lot of time into engineering these features and there’s a level of sophistication here that I really appreciate.
Summary: Overall, the build quality on this thing is impressive. Every component feels dense and screams ‘premium’ and the quality is second to none. As you may know I’m in the market for a miter gauge myself and this one is my favorite so far, but that lack of micro-adjustment has me questioning my choice. This gauge is more expensive than most of the units in this test and that price difference is justified in the overall build quality. If you’re not daunted by the price tag, it’s absolutely worth a look. And if you get one, maybe we can exchange ideas for how to outfit this thing with a micro-adjuster.
Harvey Compass MG-36 – Buy Now | $359
The priciest miter gauge on the market today is the Harvey Compass MG-36. It cost me $359 but since then I’ve noticed an odd pattern: they seem to change the price from $359 to $319 every other day. If you’re in the market for this gauge, watch the website for a few days and make sure you get the lowest price. This is a premium miter gauge and it’s obvious from the moment you open the box. The heft of the parts and overall feel is second only to Jessem. And while I can’t give any bonus points for packaging, I have to say it’s impressive to see a woodworking tool presented this way. There’s no doubt this is the best-looking miter gauge on the market, hands down. But looks aren’t everything, as I had to remind my wife in order to get her to marry me. Assembly took about 5 minutes.
The Harvey Compass features a steel protractor head with 7 positive stops, an aluminum miter bar and an aluminum fence. I have to say that this isn’t quite like the aluminum on the Kreg jig. In fact I had to double check that it wasn’t steel. Also note that this isn’t the longest miter bar in the test, but it is the longest with respect to how much of the miter bar extends in front of the fence, which is what counts when it comes to cross-cut capacity. The protractor resolution is 1 degree but I wouldn’t count on achieving that easily. The design here is kind of baffling to me. There’s a small white arrow that lives about 1/16” away from the corresponding lines on the protractor head. I can’t see any reason for this gap to exist though I’m certainly no engineer. A more effective solution would be a traditional view finder with a line that overlaps the lines on the protractor, or better yet a vernier scale like we saw on the Jessem and Kreg. But this gap? I could slide a Matt Cremona through there. At the very least, they should close the gap. At best, redesign the cursor to include a vernier scale. At this price point, I find this hard to forgive. Their sales page opens with a discussion of how most stock miter gauges are too sloppy and their engineers wanted to create something better. At this asking price, Harvey doesn’t just need to do better than a crappy stock miter gauge, they need to do better than the top dogs in this space. And this protractor system is honesty no better than, and in some cases worse, than some of the stock miter gauges I’ve had in the past. Yes, it’s smooth and it looks pretty, but the 1 degree of resolution depends 100% on my ability to eyeball a white arrow that sits 1/16” away from a white line. The fence telescopes to 36” and I have a bit of a bone to pick with Harvey about this too. They really need to correct the falsehood on their sales page that claims they have the longest fence on the market. 36” is a respectable fence length but it’s definitely not the longest. In fact, it’s not even close as Jessem sits at 38”, Osborne at 40”, and Incra at 49”.
The miter bar adjustment consists of four eccentric washers. If you loosen the screw you can rotate the washer so it presses against the miter slot. I found these to be a little clumsy as the screw tends to inadvertently rotate the washer. Once you have a setting you like, the washer winds up making another 1/4 turn, which ends up being too tight. With a little fiddling I was able to get a nice snug fit with the exception of the very back. There’s definitely a little bit of play back there since there are only 4 washers on this bar. Note that one of them is under the fence and the back 7” of the bar is floating unsupported. This really didn’t translate to a noticeable amount of error during regular use, at least for me, but this does seem to be a common complaint and rumor has it they’re working on a solution for a future version.
Now back to the pretty stuff. The flip-stop is a beauty! It features micro-adjustably that trounces anything else on the market, with a smooth adjustment knob and no tools required. It even has a cool looking cursor that tracks with the measuring tape, which is a huge improvement over the system Incra employs. The stop deflects under pressure, a little more than most. I was surprised to see that the arm of the fence actually sits about 1/8” off the surface of the table saw. Most cuts will be fine but if you want to cut something thin, it’s just going to slide right under. If you need to put a miter against the stop, you can see how that wouldn’t work but they do provide brass pins to help with registering parts like this. Oddly enough their website shows the pin as a solution for indexing flat miters too, but in reality this only results in the stop lifting up and it’s impossible to get positive registration that way. Honestly, with a flat miter you’re better off trying to index off the stop directly instead of using the pin, so I’m not quite sure why they chose to show that as a feature. Unfortunately, there’s more bad news. While the stop accommodates a sacrificial fence easily, the stop is then raised up even more to a full 5/16” above the table surface. Harvey, yer killing’ me smalls!
The fence feels sturdy and the finish on it is real nice to the touch. This thing could easily be confused with steel, just like the miter bar, at least from the perspective of a wood guy like me. It has two t-tracks on the front but it doesn’t accept standard 1/4-20 hardware. However, it shouldn’t be hard to find off the shelf hardware that fits. I mentioned previously my personal feelings about angled fences, and you can go back to the Osborne review for more info on that. To reiterate, it’s just not something I want in a miter gauge fence and the angled fence means that the stop can only get to about 3 3/4 – 4” from the blade and no closer. Though if you utilize the brass pin, you might get closer with some workpieces.
The fence was just a hair out of square right out of the box so I prepared for calibration. That’s when I noticed something odd: every detent has a decent amount of slop and it’s enough to make the difference between ‘way out of square’ and ‘perfectly square’, all while the pin sits in the detent. There’s a range of motion here that makes it impossible to know what the gauge intends as the true detent setting. It’s similar to what I noticed on the Rockler gauge, only worse. And unlike the Rockler unit, the pin spring is pretty soft so it’s not as easy to rely on the gauge snapping into its home detent position. When I tried that, I always ended up out of square. And I’m not quite ready to calibrate the fence to that new setting because each time I lock down the gauge, the setting changes slightly. This slop exists at every detent.
I also noticed that the protractor rotates too easily. The detents are less like positive stops and more like polite suggestions that an opportunity to stop has already been passed. This also seems to negate the function of the small lever and lockout that you’re supposed to use to retract the pin. You would still use the lockout if you wanted absolutely no interference from the detents but the detents are nothing but mild speed bumps. The pin itself has a round head that pops into a notch which has angled walls. The video gives you a good visual as to why the pin pops out so easily. I’m certainly no engineer, but it looks to me like this pin could really use a push forward by about 1/16”. Not only would that seat the pin deeper in the notch but it might also close that gap I talked about earlier between the protractor and the cursor.
None of this smelled right to me, so I contacted Harvey’s tech support. I was told this should be fixable with a little adjustment and that they’d send me a video in a few days. As promised, I did receive a video but it didn’t address my issues at all. The gentleman explained how to snug up the miter bar and also how to tighten the fence by turning the two knobs. I let the tech rep know that this didn’t address my issue and I also inquired about several other things I found wrong with the gauge in hopes of seeing some resolution. The reply I received suggested tightening all of the bolts throughout the gauge, which is something I did when I first noticed these issues. I explained this to the rep and his reply was that there are no further adjustments on the gauge that would address my issues and he would pass my feedback to the engineers for consideration in future versions. The help I received could be summed up as “did you try turning it off and back on again?” I inquired about a refund but unfortunately it was beyond the 30-day window.
Summary: This gauge is an absolute beauty and the materials seem to be of a higher than typical quality. There are seeds of greatness here but there’s a major failure in execution, several missed opportunities, and a couple of regrettable choices. There’s always a chance that I received a bad unit, but I’ve heard from others who have the same issues and many of the problems with this thing are just the way it was designed. Furthermore, my personal experience with their technical service left a lot to be desired. Am I being a little hard on Harvey here? You bet I am. When a company charges 30% more than the nearest competitor, they’ve got something to prove. And judging from the unit I received (and the customer service), Harvey came up short.
Final Thoughts
Picking a definitive winner here is impossible. There’s such a wide range of prices and this is more about finding the gauge that suits your specific needs at a price point you like. The more expensive ones tend to be better-made and have more features. But if you don’t need those features, don’t waste your money. So I’m going to pick a favorite below $200 as well as a favorite above $200. When I say favorite, I’m truly talking about my personal favorite, the one I think would suit my needs the best. If you find that our woodworking styles and methods usually align, then those might be good picks for you as well. If we don’t usually align, I hope I’ve given you enough information that you can make an informed choice for yourself.
Under $200 I have to go with the Incra 1000SE. While I’m stepping away from the Incra 3000, I honestly think I would have been far happier with the 3000’s simpler and cheaper little brother. You get micro-adjustment, a telescoping fence, accommodations for a sacrificial fence, a butt load of positive stops, and a fairly sturdy build for the money. The fact that adjustments aren’t tool-less sucks, but no other gauge in this price range even offers micro-adjustment.
Over $200 the choice is a little clearer. For me, it’s the Jessem Mite R Excell II. It’s built like a tank and the quality and precision justify the price. You may not personally be able to justify it, but when you pick it up you’ll immediately understand why it costs more. The lack of a micro-adjuster is a real bummer for me but I think I’m going to have to cobble together a solution for that.
While I can’t tell everyone which gauge they should buy, I can certainly give piece of buying advice that applies to everyone: do not purchase the Kreg or the Harvey, at least right now. If the Kreg situation is just rotten luck, I better go buy a lottery ticket. They clearly have a manufacturing or QC problem that needs to be solved. And the Harvey is purely a big let-down. The gauge is usable, but in its current state there are just too many flaws and I’m not sure the company will be there to support you if you are as dissatisfied with it as I am. It costs way too much to perform at this level.
I appreciate you watching/reading this extensive review. If I missed something notable, please let me know. If I made a mistake, please let me know. I’m pretty much a one-man show here and reviewing ten miter gauges is a lot to take on. I did my best to do it justice and I really hope you got something useful out of it. I know this comparison isn’t perfect, but it is the best I could do.
The post The Ultimate Miter Gauge Review appeared first on The Wood Whisperer.
from The Wood Whisperer https://ift.tt/3o7jKU9
via IFTTT
